
Inhaltsverzeichnis
Additional information
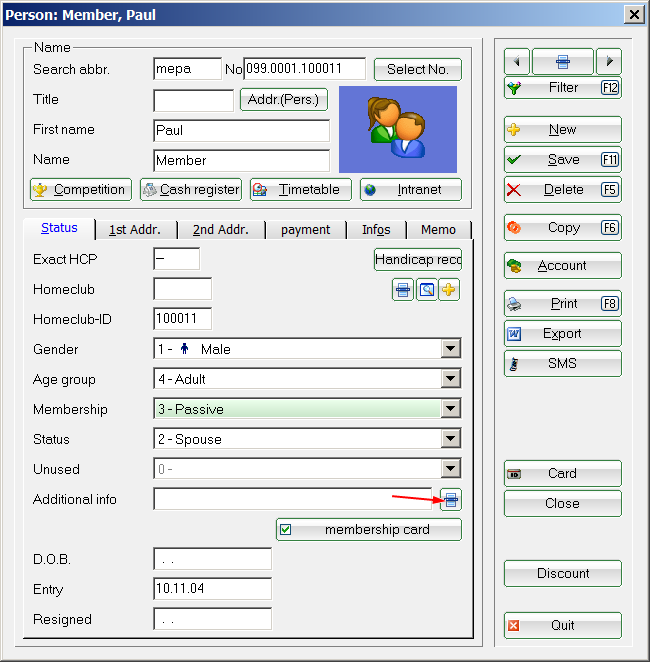
To create a new additional info, you can go to Settings/Programme settings/Additional info or click on the selection button behind the input field in the person mask:

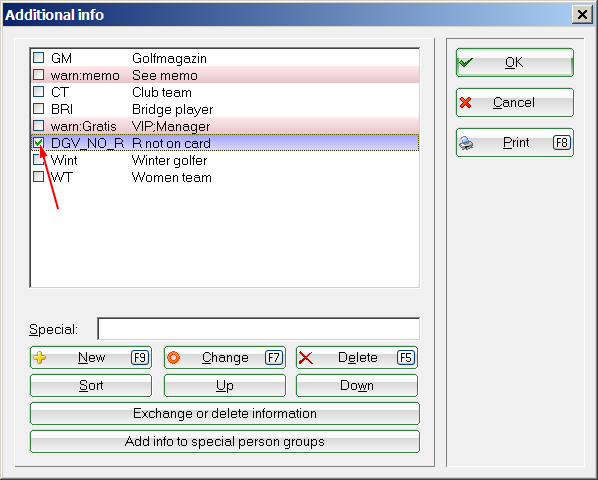
The next window opens and you now have the option via New (F9) to create a new to create new information.

You can enter individual identifiers here, e.g: Board, club team, ladies' round, seniors, etc.
You can define the identifiers and their meanings as you wish. In addition, you can add new characteristics in this overview at the touch of a button, delete superfluous ones, or automatically assign or swap the characteristics for all persons. automatically or swap them!
 Additional information entered is only displayed in the person mask with the abbreviations - separated by a „;“ semicolon - are displayed. In the additional info window, however, the existing information is displayed in plain text.

Register new groups
If you need another group for the Additional info field, you can add it directly by clicking on the New (F5) button. In the following dialogue, enter the desired abbreviation and the name of this group in the following dialogue:

Of particular interest is the option Automatic warning when dialling. If you activate this, you will always be automatically warned when dialling a person with such an ID (in the cash register, when entering start times, etc.).

Here is an example of a player who is to be denied registration for a tournament via the intranet:

Confirm your entries with OK. Please enter this additional information for the relevant persons. This means that this player can no longer register for a tournament via the intranet. For the internal blacklist, it is best to create an additional info with Automatic warning on dialling on dialling:

This opens a window with the relevant information for people who have entered this information. This lets you know that this player may not be included in the start list.
TIP As a practical example, we would like to show you below how you can use the additional info Automatic warning on selection as a reminder for important information.
To do this, set up a general additional info see Memo and activate the tick for Automatic warning for Anwahl:

Now enter the information you want PC CADDIE to remind you of in the memo window:

The next time you dial the member, PC CADDIE will remind you that there is still a message in the memo window:

The memo window is still a predecessor of the CRM\DMS module. Customers who already work with the CRM\DMS module can of course also store such a warning for a person here.
To do this, open the person window and select in the CRM window via New the category Warning category:


You will then receive the information window in which you can enter your message:

PC CADDIE will now automatically remind you of this information as soon as you call up the customer again:

You can find more information about the CRM\DMS module here: CRM\DMS module
Swap or delete assignments
Use Swap or delete assignments to replace all persons for whom a specific identifier is entered with a different identifier.

If you leave the second field empty, the identifiers are removed for all persons.
TIP If you want to delete additional information that has already been assigned, first change the additional information that is no longer required to „EMPTY“ - as described above - and only then delete the entry that is no longer required from the list of additional information. This ensures that the entry that is no longer required is also deleted from the person window, or that the person window does not contain any entries that can no longer be assigned to an identifier. However, before you make any changes or deletions, create a checklist to be on the safe side so that you can still access the „old“ inventory.
Save such control lists as an Excel file and store them in the CRM\DMS module in PC CADDIE. Or create a folder on your computer that you can use as an archive. This way you always have quick access to the saved lists and can retrieve the exact information even after 3 years.
Assigning identifiers to groups of people
You can simplify your work by automatically assigning an identifier to freely definable groups of people. For example, you can assign the identifier „cmd“ for the additional information „Ladies' club team“ to all ladies with a handicap of up to -15.0. To assign the identifier to the person group, click on the button Assign identifiers to person groups. The following window then opens:

Via Define you can filter a person group for which the selected additional info is to be entered. Click on the OK button assigns the desired additional info to the persons all at once.
The additional information system is very versatile. It can help with list printing, mail merge, address labels, assigning contributions and much more. For more information, click on the link: List of persons
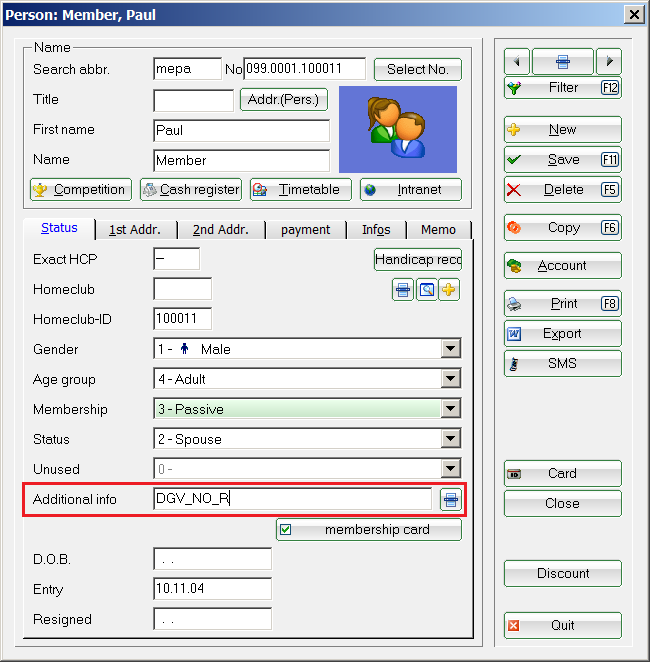
Assign additional information to a person
Example: The regionality indicator R should not be on the ID cardeven though the member lives within 70 km.
Clean up/delete additional info

Open the additional info in the person

- Additional information for selection
- Manually entered additional information
- Button for clearing/deleting

- Tick additional info
- Additional info as manual can also be ticked
- This additional info is used for this many people
- The persons used can be displayed and edited here
With the button: Clean up, all ticked/marked additional information is deleted.
Covid - Status
Only the golfer may enter their golfen_nur_mit_3g_-_covid_status_online_login in their own PC CADDIE online log-in. The increased protection requirements under which health data may be processed and stored must be observed. Please clarify this with your data protection officer before making an entry.
Covid status dialogue
The corresponding status can be selected in this dialogue. „None“ is selected by default. The date is also selected. Clicking button number 3 automatically sets today's date.
| Number | Name Name | Name Description |
|---|---|---|
| 1. | Selection of Covid status | You can select one of the four statuses in this list |
| 2. | Select the date of the status | Vaccination date of the second vaccination, recovery date or tested date |
| 3. | Select the date of the test | Confirmation that the golf club has seen and checked the customer's details. |
| 4. | Configuration of the validity button | With this button, a new dialogue will appear in which you can set the days for the validity period. |

Validity configuration
You can use the „Validity configuration“ button to specify how long a certificate is valid and whether it should only be valid after verification in the club. The validity periods defined by the legislator are currently preset as of September 2021. Please note that this information may be changed by the legislator over time and must be adjusted accordingly in this case.
| Number | Name | Description |
|---|---|---|
| 1. | Validity Tested | The number of days the test is still valid is entered in this text box. |
| 2. | Validity Recovery | The number of days of recovery still valid is entered in this text box. |
| 3. | Validity Boosted | The number of days the vaccination is still valid is entered in this text box. |
| 4. | Validity Vaccinated | The number of days the vaccination is still valid is entered in this text box. |
| 5. | Validity of vaccination waiting period | The number of days of the vaccination waiting period that is still valid is entered in this text box. |
| 6. | Maximum age Children | Are excluded from compulsory vaccination. The age limit must be adjusted, as this is different for each federal state |
| 7. | Certificate with local inspection | This checkbox is ticked if the certificate must be seen and checked locally. |
| 8. | Show check status in the cash register | The syringe is displayed next to the customer name in the cash register |

covid_status_im_pc_caddie_lokal_-_anzeige
You can now also print the information on Covid status on a List of persons print.
<COVID> ⇒ Only prints „OK“ if the status is correct
<COVIDI> ⇒ prints a little more information about the status
Please note that lists containing health data are subject to particularly strict data protection guidelines and clarify their use with your data protection officer.
- Keine Schlagworte vergeben
PC CADDIE AG
Bachtelweg 3
6048 Horw/Luzern
Schweiz
Kontakt
![]() Fon +49 2642 9854110
Fon +49 2642 9854110
Fax +49 2642 9854199
![]() Fon +41 41 5110600
Fon +41 41 5110600
Fax +41 41 5110699
![]() Fon +43 13 55667788
Fon +43 13 55667788
Fax +43 13 55667799
Mail support@pccaddie.com
Web www.pccaddie.com
Support Online-Module
PC CADDIE://online
GmbH & Co. KG
Fon: +49 2642 9854120
Fax: +49 2642 9854169
Mail support@pccaddie-online.de
Web www.pccaddie-online.de
Tägliche Supportzeiten:
April-Oktober
09.00 - 20.00 Uhr
November-März
09.00 - 18.00 Uhr