Inhaltsverzeichnis
Open item postings
In PC CADDIE, it is possible to manage open items from cash bookings in a separate account area (OP area). This has the great advantage that you have a constant overview of the outstanding amounts and can manage them very easily and effectively. If you would like to use our service, please contact PC CADDIE Support for the installation of the OP area.
Cash register - Post to account
With this function you can leave postings open in the accounts (open item postings). Payment can be made at a later date. If you click on this button during the payment process Post to invoice in account you will see the following window:


With OK the booking is finalised.
If you select this customer later in the cash register, you will see the open balance in red or a credit balance in green at the top right.


If you would like to enable „on account“ only for customers with direct debit authorisation, please contact our support team for installation.
If you only want to block account bookings for individual customers, enter the additional information „NOOP“ (without inverted commas).
If you would like to generate an invoice from this outstanding amount, this is possible via the OP area (please read the chapter Edit accounts).
Payment of the outstanding invoice can be made either by cash/credit card or by bank transfer. The procedure for these payment methods is different. Please read the following chapters.
Reference code
You can also enter a reference code when booking.

In the OP area, add the article with the command <REF> command:

The invoice will look like this:

You have a total of 30 characters available, which may not be sufficient for long article names and booking numbers. In this case, you can also use a different command: <NOR> (number or reference)
The booking number is then printed, unless there is a reference, in which case this is printed.
Payment of open items with cash or credit card
To do this, first call up the customer in the cash register. The payment of an outstanding amount is initiated via the account button.
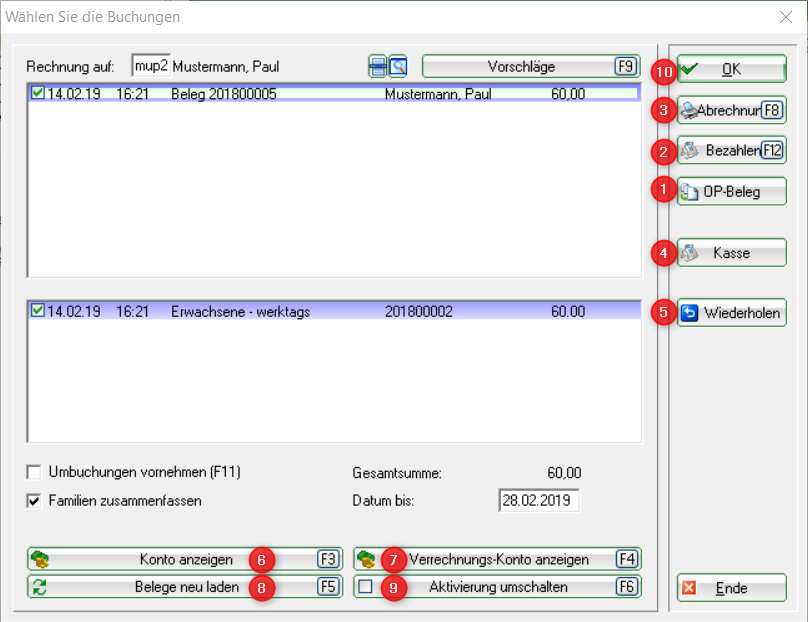
- OP document: Here you can print an invoice for the open items!
- After clicking on PAY you will see the usual „Pay“ window of the cash register. PC CADDIE automatically balances and proposes the total amount to be paid.
- Settlement prints the receipt
- Click on Cash register you are directly back in the cash register window.
- With Repeat you are in the overview of the till receipts that have been created since the last daily closing.
- With Show account you are in the sales account of the customer's till
- Show clearing account switches to the customer's sales account in the account area for open items.
- Reload receipts is useful if you have a large number of vouchers and you have not ticked the appropriate box at the top, for example. The vouchers are loaded again complete with tick marks.
- Toggle activation removes all tick marks from the vouchers.
Payment of open items by bank transfer
The outstanding invoice was paid by the respective person by bank transfer and now you would like to post this payment in PC CADDIE. If the cash register is still open, please close it. Select the corresponding account area in which the invoice is open (e.g. OP) and open the sales account via Turnover and Edit accounts.
You will find the outstanding amount here as a white, posted invoice entry

Please click on Pay

The following window opens:

- Amount paid: PC CADDIE automatically balances the amount still outstanding and invoiced up to today's date.
- Payment method: Please select the appropriate payment method using the list button on the right.
- Remark: This line is intended for additional notes/remarks.
- Payment date: Today's date is shown automatically, please change if required.
After you click on Book the window opens Select the invoice number. If you have created an invoice, this is now automatically recognised and highlighted in blue. The payment is assigned to this invoice. If you do not select an invoice (i.e. highlighted in blue) and credit the amount to the account, all open invoices will be credited with the amount proportionately. You can recognise this by the red circle on the right.

With OK to finalise the booking. The payment is posted to the sales account and a green tick is placed next to it:

If you do not select an invoice, you will see the red circle as mentioned above:

 You can also post a bank transfer directly in the cash register in the same way as a cash or credit card payment.
This may be particularly interesting if you use the accounting export. You can use it to ensure
that this posting is also exported directly with the export of the cash register area.
This is particularly practical if there are no direct debit authorisations in the operating theatre area
(Please discuss the process in detail with the support team). The total amount is shown on the daily closing. This is transferred to the accounting department during the accounting export.
You can also post a bank transfer directly in the cash register in the same way as a cash or credit card payment.
This may be particularly interesting if you use the accounting export. You can use it to ensure
that this posting is also exported directly with the export of the cash register area.
This is particularly practical if there are no direct debit authorisations in the operating theatre area
(Please discuss the process in detail with the support team). The total amount is shown on the daily closing. This is transferred to the accounting department during the accounting export.
Payment of amounts in advance
We envisage a situation where your customers pay amounts in advance before they have received the goods, as an advance payment so to speak. This amount must be posted to the account as a credit.
To do this, call up the customer in the cash register. The payment of an amount is cancelled via the clear button. PC CADDIE displays the usual payment screen:

Select the appropriate payment method and enter the amount. You will automatically recognise the same amount under „Change“, which is correct. Then confirm with OK :

Here it is important that the amount is posted as a credit. If the open item area has been installed, this posting is immediately moved to the open item area.
If you now call up your customer in the cash register, you will recognise his credit balance of € 100 in green letters.
Cancelling open item postings
As you can only cancel cash register postings with corresponding offsetting entries in the cash register, this also applies to postings in the OP area.
The cash posting was made a few days ago (daily closing has already been printed), the amount is open in the OI area and should now be cancelled:
Here is our example - Emma Mustermann has € 14,- open, which is displayed in the top right of the cash register window.

You now need the invoice number of this booking. To do this, select the customer on the left-hand side of the checkout window and click on Account and Show account.

The invoice number for Emma Mustermann in our example is 35:

Back in the checkout window, press the button Repeat and Archive

In the window Select invoice window, enter the customer and the invoice number again.

and press OK.

Then click on Reactivate invoice for cancellation and the booking can be found in the cash register again.
 .
.
Please make a normal cancellation: Select the article (in our example the Riesling), then click on the button cancellation button and cancel the booking.

The last step is to derecognise the posting using Post to account
 .
.
When booking out, please click on the Post as credit when posting.

As soon as you call up the customer again in the cash register, the open balance has been updated in the top right-hand corner. You are welcome to check the account again:

One OP area for several cash account areas
It is always possible to manage open items from several cash account areas in a single OI area. We imagine, for example, restaurant bookings and proshop bookings whose open items are to be managed together in the OP area. In this case, please contact PC CADDIE Support.
Two OP areas for one cash account area
This variant is also possible and feasible with PC CADDIE. An example in which you could use this option would be a catering cash register area that flows into two OP areas (e.g. GMBH and VERZEHR). In the GMBH area, for example, the invoices of the hotel guests are administered and in the VERZEHR area the open items of the catering guests.
You can find the settings under Settings - Programme settings - Checkout payment methods.


The order of the two areas should be chosen sensibly; the area that you need most frequently is at the top of the configuration.
Please note that the two areas you define here must be contribution account areas.
This setting has the following effect on the cash posting in the catering area: You post an open consumption to the guest's account as normal and can then select the appropriate OP area with the OK button:

OP account area
The OP or open items area is particularly popular for the catering industry with consumption flat rates. However, it is also used to pay annual invoices via the cash register.
Installation
In order for the exchange of the areas to function properly and comprehensibly, it requires:
- Transfer payment types in all corresponding areas
In the cash accounts area (SALES, GASTRO, PROSHOP)

- Payment type identifier
- Name referring to the area. <NO> Transfers the document number to the open items area
- Search abbreviation must always contain the name of the recipient area
In each recipient area (OP, VERZ, CLUB, AG, GMBH, etc)

- Name referring to the area of origin. <NO> for the document number
- Search abbreviation must also contain the name of the recipient area (postings from several cash account areas can be transferred to the contribution account area).
- Search abbreviation in lower case is for the payments/credit notes in the cash account area. Capital letters for the generated turnover. This is not mandatory but is advantageous for clarity in the account.
- Install transfer area - in the cash account area
Settings / Programme settings / Cash register payment types

- Cash register payments - Payment methods 1 & 2

- Payment methods can be selected manually here
- or all can be added automatically
- The ticked payment method is used/posted in the cashbook
- Transfer postings

- Select recipient areas
- preset tick. The balance of the account is displayed in the cash register
- Deposit or payment of open items possible via the „Account“ button in the cash register. If several areas are ticked, these are proposed for selection in the cash register.
- Text on the receipt

- Title of the receipt
- Note on the receipt
- Font size of the note on the receipt

Handling in the cash register - payment into the account via cash register

- Select customer
- Balance of the account
- Select account
- Select clearing accounts

- Customer
- Total document or invoice
- Individual postings or articles
- Balance of the account
- Close the view
- Print the invoice
- Pay in the cash register
- Get to the cash register for further actions